| “ | Wasn't that long ago that I was planning on my retirement... now the only thing that's getting retired is my standards. | ” |
Shipping... and Receiving is the second mission in Thief II: The Metal Age. Garrett, running low on funds, decides to pull a lucrative but amateur job on a warehouse in the Wayside Docks.
Overview[]
Sheriff Truart has been making Garrett's professional life difficult, and as his landlord is coming the next day to collect the rent, he decides to raid Rampone Dockside Shipping, a warehouse in the Wayside Dock District. Rampone's is home to several small businesses which house valuable items as diverse as musical recordings, artwork, artifacts and recipes. In addition to this usual shipping traffic, there is also a small smuggling operation of rare spice sponsored by the local underground. Not too many guards, lots of dark corners and several points of entry should make this job painless, and profitable.
Objectives[]
- Building-A is a warehouse which many tenants use to run their businesses. In the main office, you should be able to find out how to break into the sealed areas of Building-A. (Normal)
- After you're done, you'll need to get out of the area quickly so you don't get caught. Return to the stack of crates where you first entered the warehouse district.
- The landlord is coming tomorrow.
- You need to steal at least 500 loot to cover the rent and other expenses. (Normal)
- You need to steal at least 650 loot to cover the rent and other expenses. (Hard)
- You need to steal at least 850 loot to cover the rent and other expenses. (Expert)
- There are many unarmed workers around the warehouses. Killing them would bring unwanted attention your way. (Hard)
- Gilver knows he's sending out a very important shipment tomorrow, but what he doesn't know is that it's being redirected to your fence. Find a new shipping label and put it on the big crate outside of Gilver's office. (Hard/Expert)
- Some rare spice has been smuggled through the warehouse district lately. Find it and you'll make some quick cash on the black market. (Expert)
- You're a thief, not a murderer. Being the professional that you are, you can pull off this job without killing anyone. (Expert)
Gear[]
Starting Gear[]
Normal[]
- 35 Broadhead Arrows
- 3 Water Arrows
- 1 Healing Potion
- 1 Invisibility Potion
- 2 Slow-fall Potions
- 5 Flares
- Lockpicks
- Sword and Blackjack
Hard and Expert[]
- 20 Broadhead Arrows
- 3 Water Arrows
- 1 Slow-fall Potion
- Lockpicks
- Sword and Blackjack
Shop[]
- 15 Broadhead Arrows
- 5 Water Arrows
- 1 Moss Arrow
- 3 Flash Bombs
- 3 Healing Potions
- 3 Invisibility Potions (1 on Hard and Expert)
- a papyrus
- 3 Slow-fall Potions
- 5 Flares
Characters present in the Mission[]
| Type | Count | Notes | ||
|---|---|---|---|---|
| Normal | Hard | Expert | ||
| Common Sword Guard | 8 | 12 | 12 | Less guards patrolling the yards around the buildings |
| Common Bow Guard | 6 | 9 | 13 | |
| Assassin | 3 | 3 | 3 | Those are actually Davidson's smugglers, but being hardened and ruthless types they use the Assassin model. |
| Nobleman | 1 | 2 | 2 | The man in the main office is removed on Normal. |
| Servant | 3 | 3 | 3 | |
| Hammerite Guard | 1 | 1 | 1 | Brother Uriel |
| Yellow Spider | 9 | 9 | 9 | 4 of which are dead |
| Green Spider | 3 | 3 | 3 | 2 of which are dead |
Storyline Characters[]
Mechanist Rising[]
There are many references to the rise of the Mechanists and their technology. Firstly, Brother Uriel's mention of the decline of his order and long rant about the Mechanists.[1] Secondly, inventor Cid Cappezza's workshop that contains Scouting Orbs and Lord Porter's Art Gallery containing a metal statue of a mechanist angel. Further there are mentions of the disappearance of trees, the appearance of factories and Angelwatch and the existence of Watchers.[2] The Mechanists even have almost completely taken over Building B of the company and use it for shipment of their goods. Both the offices in it and the money they bring in signal the importance of their organization.[3][4]
Even direct appearances of their technology can be seen. The Security Code Lock, that controls the bay doors in Building A,[5] and the Locking Mechanism, both invented by Cid Capezza, can be found throughout the mission; at the top floor of Building B a Watcher is installed and in large crates on the ground floor a Combat Bot and, if some small Crates are removed, a large metal head can be found.
There are even some mentions of the rise of the City Watch by Venik Kilgor in his diary that presumably happened along the rise of the mechanists.[6]
Difficulty Alterations[]
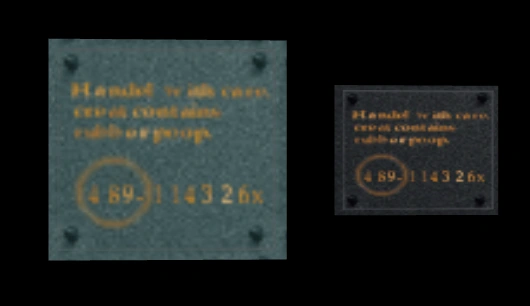
Shipping label(s)
The mission appears a different story on the easiest setting. On Hard and Expert a lot of useful items and loot gets removed, in exchange for a lot of new guards patrolling around. Also some of the guards' patrols stop points (troll points) get modified on different settings. Both the real and false shipping labels are removed on Normal, corresponding to the objectives.
Smaller changes include: a locked chest near the starting location is removed on Hard and Expert; the opening crate next to the lamp near the starting locations contains 2 Flash Bombs on Normal, 1 on Hard and 0 on Expert; one Broadhead Arrow in each of the control shacks is removed on Expert; a locked chest with a Flash Bomb, in Bramrich's space is removed on Hard and Expert; a money box containing a blue key, in Mynell's space, is removed on Hard and Expert, where the key is located above the spider cool storage; also in Mynell's space the control box to the cold storage is removed on normal and the door is unlocked; two Noisemaker and 4 Broadhead Arrows in Venik Kilgor's space are removed on Hard and Expert; a Healing Potion and a Scouting Orb, in a hollow crate, near the South-West end of building A are removed on Hard and Expert; a Money Box containing some coins, behind some boxes on the first floor of Building B, near the stairs, is removed on Hard and Expert; a silver coins stack worth 12 gold in the rare artifacts bay in building B, is removed on Hard and Expert; two gold coins stacks worth 2x25 gold, in the north-east office in building B second floor, are removed on Hard and Expert.
Walkthrough[]
Loot List[]
Total loot:
- Normal: 831 Gold + 225 Gems + 755 Goods = 1811 Total Loot
- Hard: 685 Gold + 225 Gems + 755 Goods = 1665 Total Loot
- Expert: 685 Gold + 225 Gems + 755 Goods = 1665 Total Loot
Loot list: Keeper's Chapel
Secrets[]
Total secrets: 14
Secret 1[]
Location: On the west side of Building A
Claiming: Go south from the starting location. Right next to the first (western) control shack there is a tall pile of crates. You can climb on it either by climbing on the control shack from its side or climbing on the catwalks and jumping from there. The top crates are hollow and you can drop inside the pile ad discover a locked chest.
Loot: A Rope Arrow which would make getting around much easier.
Secret 2[]
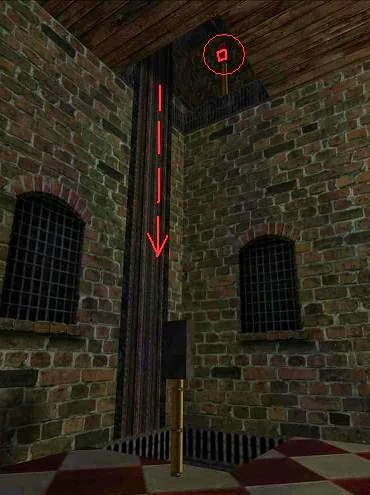
Location: Lord Porter's area
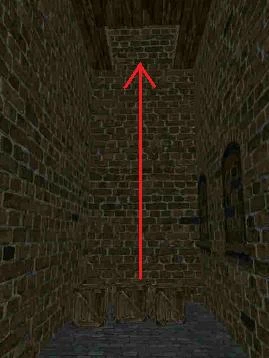
Claiming: In Porter's shop there is an elevator stuck on the upper floor. The panel on your level doesn't have a button to lower it, but you can shoot the lowering button on the panel on the upper floor with a Broadhead Arrow. Note if you hit the upper button the elevator won't come down. Aim for the lower button.
Loot: No direct loot, just access to the second floor.
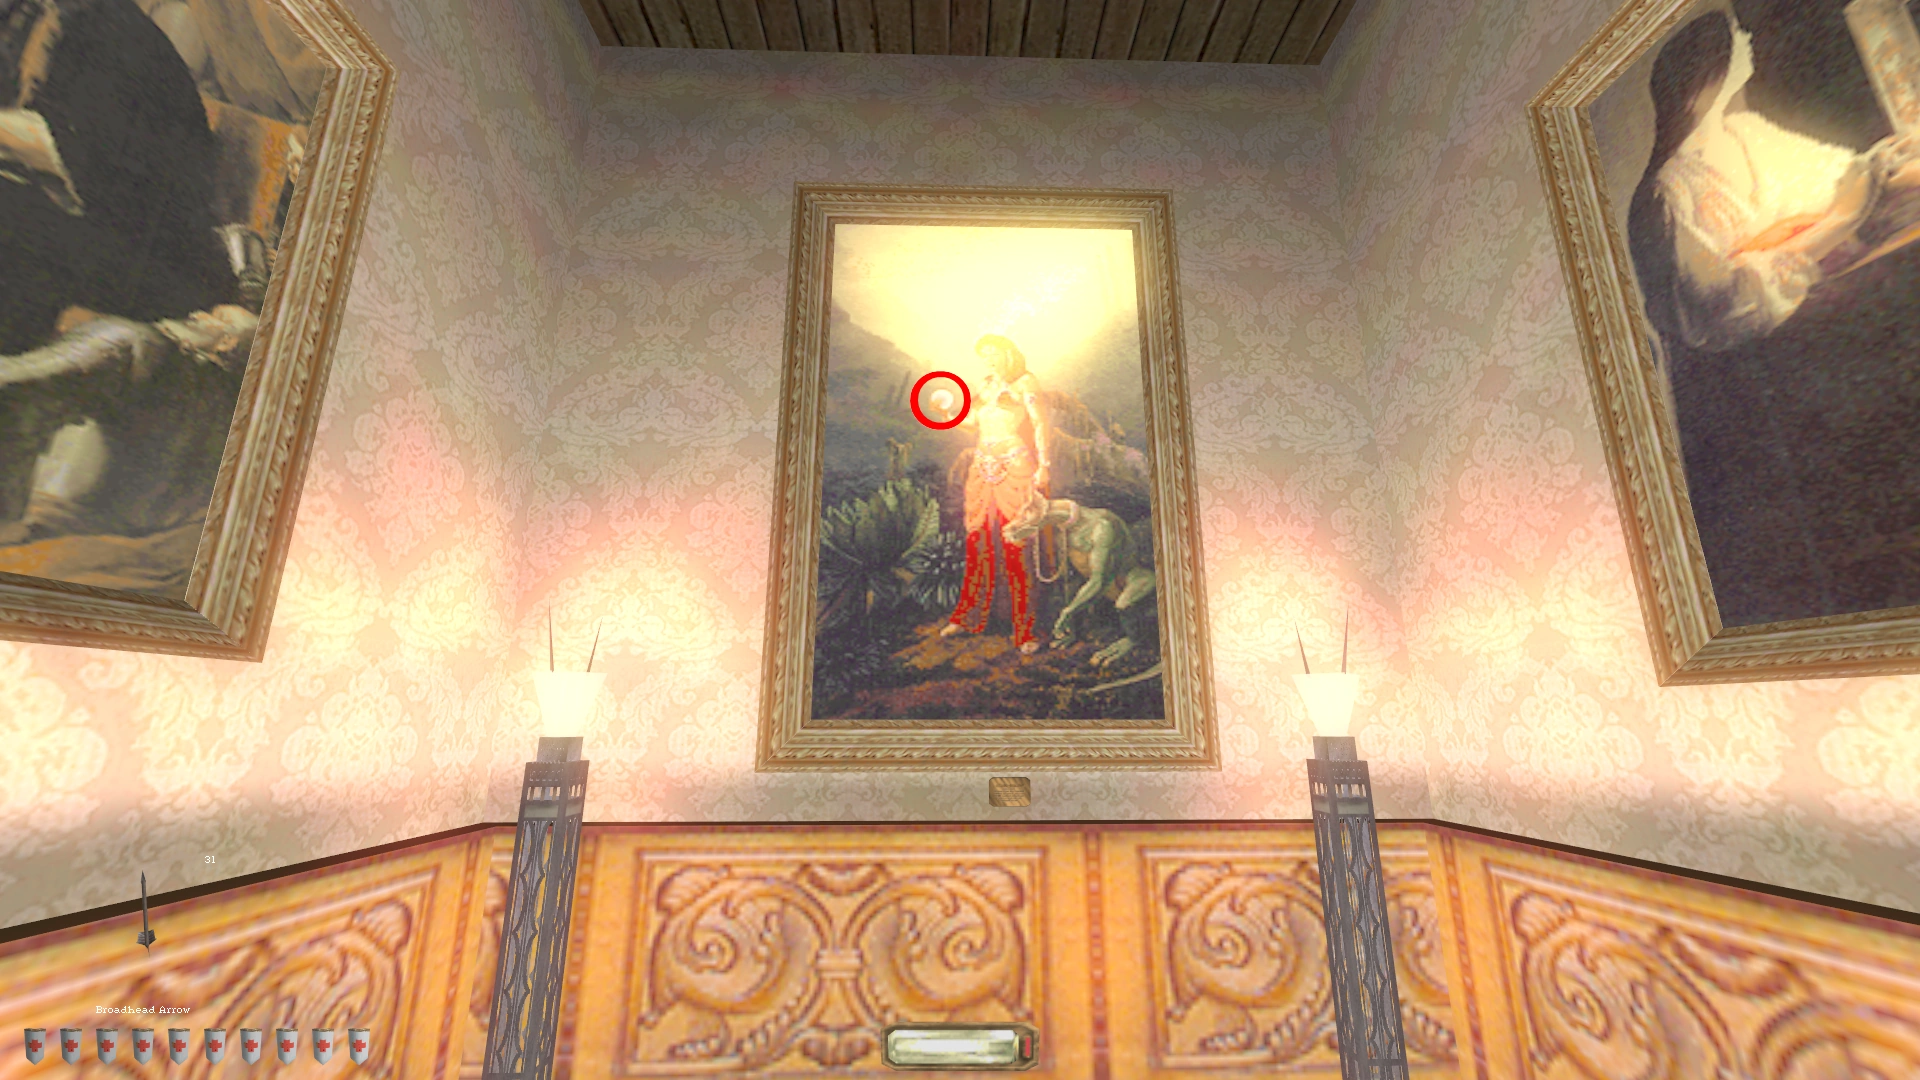
Secret 3[]

Location: Lord Porter's area ground floor
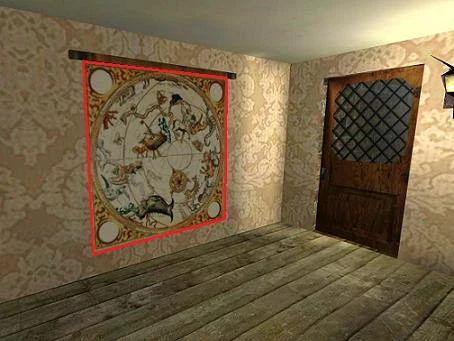
Claiming: At the end of the gallery in porters shop, there is a painting with a plaque under it. This plaque reads:
- "Let thine arrow fly, into mine crystal eye"
Shoot a broadhead arrow on the orb that the woman in the painting holds. The painting will open a hidden corner with a statue behind it.
Loot: a statue worth 65 goods (at least on normal check numbers and add them to the total goods in this mission).
Secret 4[]
Location: Lucky Selentura's area
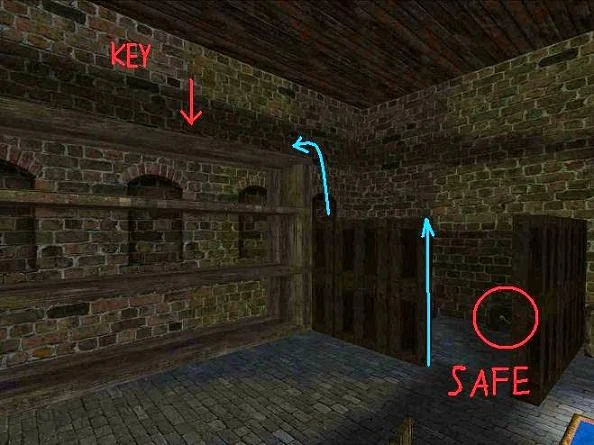
Claiming: In Lucky's area there is a small box hidden on the top shelf across the gambling table. You can either mantle up to it, which is a bit tricky, or for the easy way, use a Rope Arrow (from Secret 1). In the box, there is a key to the green safe in the sleeping compartment. Open the safe.
Loot: Lucky Selentura's dice worth 50 gold
Secret 5[]
Location: Gilver's area
Claiming: Once inside Gilver's space, go to his office. There is a banner inside and if you cut it, you'll find a hole behind.
Loot: A gem worth 100 in gems.
Secret 6[]
Location: Kilgor's area
Claiming: On the first floor of Kilgor's space there is a huge pile of crates. Climb to the back of it and there you'll find a locked chest.
Loot: A golden hammer worth 25 gold.
Secret 7[]
Location: Mynell's area
Claiming:
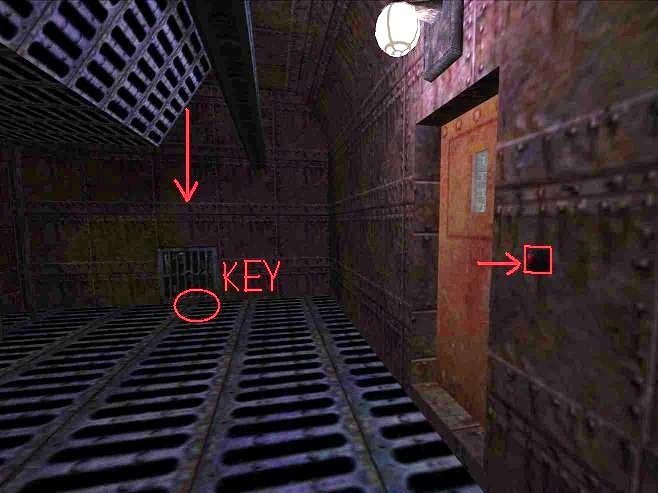
- Hard and Expert - Once inside Mynell's space take the left (south) elevator to the upper floor. There is a cold storage and inside next to the orange door there is a button. Pushing it will open the freezer's ceiling vents and a blue key will drop on the floor. Find it, pick it up, climb trough the vents (as the door is locked now) and return to the ground floor of Mynell's area. The take the north elevator. In that room you'll find a big safe. Open it with the key.
- Normal - The blue key to the safe is inside the spider cage in a small box. After you claim it go straight to the northern elevator.
Loot: A special scroll worth 50 goods.
Secret 8[]
")
")
Location: Building B, first floor
Claiming: On the south-east end of the main storage area of Building B, on top of the huge pile of crates you can see a chest. But there is no way to climb to it from here. You can gain access to that area by going to the roof, breaking the most south-east skylight and dropping down through it. Climb to the chest and unlock it. There is also another locked crate, that has a bag of spice in it.
Loot: Another Rope Arrow.
Secret 9[]
Location: Building B, first floor
Claiming: Note that you will need a Rope Arrow to claim this one. Go to the inside staircase of Building B and enter the side room on the first floor. At the end of the room there are some boxes. Shoot a Rope Arrow into the ledge and climb up.
Loot: A scouting orb and an invisibility potion.
Secret 10[]

Location: Building B, third floor, Rampone's office
Claiming: In Rampone's office there is a big bookcase to the right of the entrance door. Check the central area of the book case, on the 3rd shelf, for a movable book. It will slide a part of the bookcase gaining access to a secret area.
Loot: A gold candlestick worth 50 gold, plus Rampone's diary (reading material).
Secret 11[]
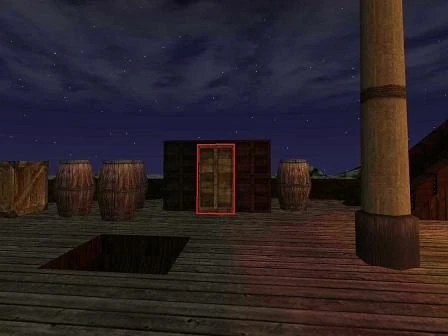
Location: Davidson's ship, top deck
Claiming: On the top deck of the pirate ship there is storage crate. Open it to find a bag of spice which is considered a secret. Note that there will be some Yellow Spiders in there as well.
Loot: A bag of spice worth 20 goods.
Secrets 12, 13 and 14[]
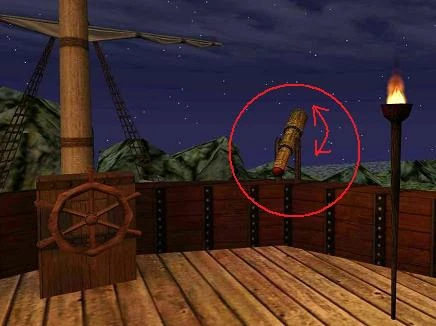
Location: Davidson's ship, top deck and Davidson's quarters
Claiming: Note than you will need Davidson's key from the belt of one of the bandits patrolling the ship. On the top deck near the steering wheel, there is a telescope. Moving both the wheel and the telescope will open a crate in Davidson's quarters. Go down to his room and take the contents of the crate. Then turn around and notice the two banners in the room. Behind both of them there is a chest with loot. The chests are both opened with Davidson's key.
Loot: A bag of spice worth 20 goods, a Fine Wine bottle worth 25 goods and a golden nugget worth 100 gold.
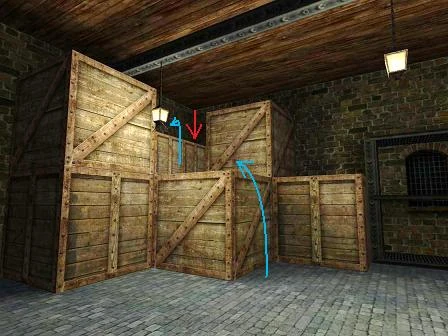
Other Stuff[]
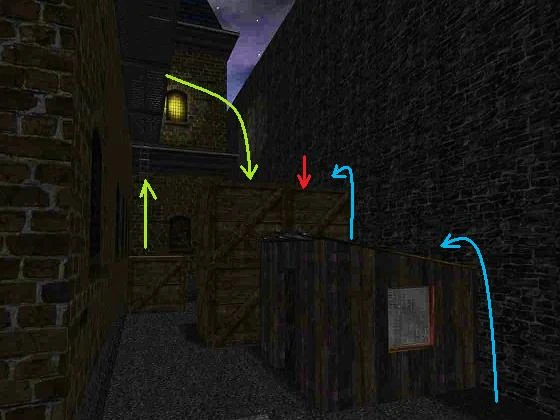
Although this mission has a whole 14 secrets, there are a great many more hidden compartments, spaces and loot that are not considered secrets. Check for opening crates that look just like the regular ones, check around dark corners, but especially check the huge piles of crates. Below is a screen from the yard between Buildings A and B, that shows a couple of hidden compartments.

Easter Eggs[]
Entering the code «7002» at a control box will cause the note, lying on the table at the second floor of Lord Porter's Art Gallery, to change. The new text has some details on the secret brothel's activities, clients, and prices.
Tips[]
General[]
- Although this mission's area is not the largest, the mission itself is time consuming because there are lots of areas to visit and things to accomplish. It's advised to save regularly.
Loot[]
- Those crates in the yards are not just for decor! Some of the crates are hollow and can be jumped in from above while other have tops that can be opened revealing hidden loot or gear.
- This mission is quite secret heavy and a Rope Arrow is needed in some difficulty settings to access a secret and useful in general. One can be found in some crates around Building A.
Sneaking Around[]
- The control shack key is in the office area. Although there is a nice entrance from the roof, it is a well patrolled and lit area. It would make it easier to go around Building A if the north patrolling guard is pickpocketed for his Building A key.
- Crates that have tops that can open, are registered as doors and will clang like metal if landed or walked upon. They are also difficult to mantle onto.
- The catwalks on the side of the building A and B are on one hand a good way of quickly moving around, but on the other, noisy enough for the guards on ground level to hear.
- Captain Davidson's Ship has a ladder on its stern that can be used to climb aboard stealthily.
Enemies[]
- Davidson's men, being hardened smugglers and pirates, are far tougher than the regular guards. There is one in particular, perhaps Davidson himself who faces the well lit gangway all the time makes it difficult to ghost.
- The guard patrol routes will change if emergency doors in storage areas are unlocked. In this case the guards actually will cut the corners on their routes.
- Kilgore and the Brother Uriel are deleted by the game after they have entered the shop, so there is no need to worry about then anymore. This deletion can be immersion breaking however, so if it bothers the player, it is best to not open his shop first and give it some time.
Security Systems[]
- The bay doors can only be opened one at a time with the security lock, any code input (even single number) will cause open door to be closed, but if the bay door is opened by switch it will retain opened.
- The Watcher near Rampone's office can be easily disables with a switch in front of the hallway.
Trivia[]
- The Yellow Spiders at Mynell's Steaks are not hostile to the guards but if Garrett alert them and then escape up the elevator, the small ones will attack the big one.
- The yellow spider at the pirate ship will attack Davidson's men on sight but can't hurt them and they can't hurt them back, so their confrontation will be endless and somewhat hilarious.
- Although Mynell's steak recipe can't be read (due to it being loot), it is clear from the contents of the freezer and spider cage that his recipes consist of giant spiders, Fish, venison, and the severed heads of an unidentified animal resembling a monkey. Garrett reacts with disgust upon discovering Mynell's 'secret ingredient' in the cage.