
 |
|
"They don't call the rooftops the Thieves' Highway for nothing..."
Other Level Resources:
- Loot Map - Go here for a complete listing of all the loot locations.
- Secrets & FAQ Page - Go here for pictures of all the secrets in this level, as well as some frequently asked questions.
Starting Objectives
- Stay off the streets
- Don't kill anyone
- Infiltrate Angelwatch Tower
- Spy on Karras to learn why he's having the party
- Read Karras' latest entry in the new scripture of the Master Builder
- Break into Karras' office to find some information on the Cetus Project
- Get back to the safety of the bell tower
Ending Objectives
- Activate all of the voice machines
Loot Information:
- Requirements: At least 1550
- Available: 2853
- Accounted For: 2853
South Map
The Bell Tower
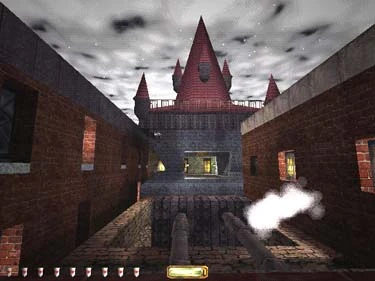
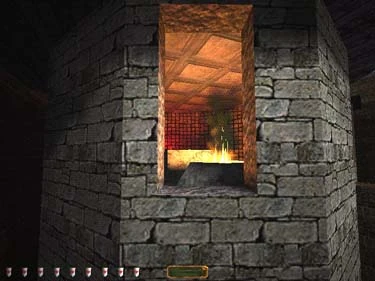
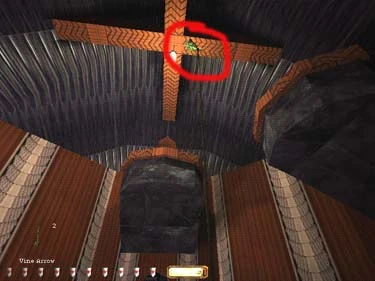
Start at the bell tower and drop to the ledge on the left - the last window is a secret containing some loot and a few water arrows. The first open window on the right has a crate with some copper coins (5) and a sleeping guard wearing a purse (10). Outside, go across the pipe, search for the keeper in the window to your left, then shoot a moss arrow to the bottom of the ladder and climb down. You can get to the open window using a rope arrow (note the wooden turret overhead). With a moss arrow and a scouting orb you can use the shadows on the right inside the room to sneak past the archer (or just toss a frog egg through the window if you're not concerned with dealing damage). Grab the gold coins (65 gold) in the chest. Back up the ladder, continue west and down the ladder on your left. Go through the open window into the room with the vase (beware the patrolling swordsman). There is an entrance to a secret Astronomer's room here above the rafters in the northeast corner (figure 1).
|
| Figure 1 |
Secret - In the Astonomer's room, frob the telescope for a sunburst device and fire arrow. Move the boxes, go down the ladder and through the window by the table to a porch. Beware the patrol here, and go left to the guard quarters for some loot. Head back to the rafters on the other side of the astronomer's room. Go up the stairs and out the window to the right.
The Lady Van Vernon & Lord Willy
Go toward the tower on the north side of the street and position yourself at the bottom of the ladder. Listen to the argument, then climb the tower and quickly jump to the right window. Grab the purse (100 gold) on the table and exit through the opposite window. Jump to the ledge and go left. Jump to the machine, climb up to the breezeway and grab the gold cup (25 gold) on the table. Head west till you reach another guard. Distract him and run North to mantle up to the next roof. Climb between the ramparts and head right to the front of the building. There's a swordsman with a key to the door, and an archer patrolling here. Stand outside with the door open and observe the patrol inside. The front room has a gold vase (100), the back room has 3 stacks of silver coins (36 total) behind the door. Back outside, head to the Northwest corner and eavesdrop on the two housebreakers. Then work your way to the back of the building and climb to the ramparts again. Jump to the wooden ledge.
Thieve's Hideout
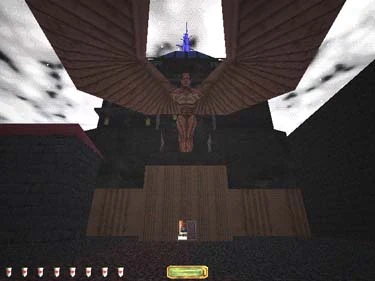
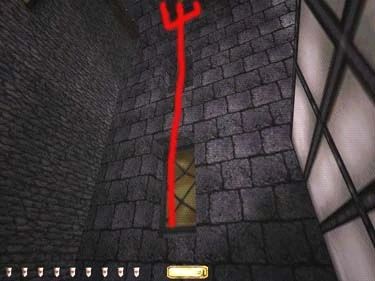
This area of the map is shown in figure 2 below. Jump down to the pipe and drop through the hole in the roof. There should be 2 hanging moss arrows, a vine arrow in the crate and a ring (25). Climb out and go to the broken window on the East of the building. There is a Thief in here. Get his stash from the back room, and some flares from the end room. Go back out to the wooden ledge and use a vine arrow to climb back up. Turn right and climb the ladder in to the water system. Follow it and open the door using the turn switch. On the rooftop, jump down to the ledge on the north and turn right to grab Rothchilds purse (100 gold) through the window. Go west down the ledge and jump across to the Necromancer's Spire (figure 3).
 |
|
| Figure 2 | Figure 3 |
Necromancer's Spire
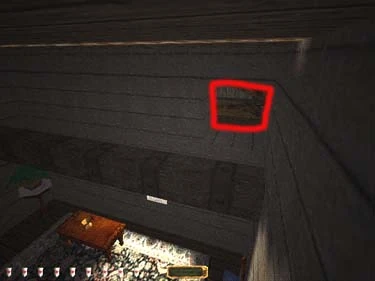
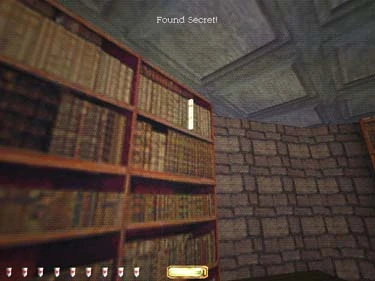
Grab the candlesticks (worth 50 gold each - don't read the book!). Secret - Click the fire pit to open a trap door you'll come to in a moment. Look for a highlighted book on the bookcase (figure 4) on the next lower floor.
|
| Figure 4 |
This opens a cover on the elevator which will take you to the lower levels. Down here you'll find a healing potion, speed potion, and some coins (100) in the blue box. Jump through the trap door for an invisibility potion. Go back up and out the window with the plant to the next building. Grab the plate (50) behind the crates, then take the ladder down the shaft. In the next room, move the boxes to uncover the hole and climb the stairs to the top floor. There's a guard patrolling here. In the top room you'll find the house burglars. Grab the coins in the box (25) and the ring on the dresser (100). If you leave the door open the guard and a burglar will fight, giving you a chance to slip out onto the 2nd story fire escape. Go back to the Necromancer's Tower and out to the ledge where you started.
North Map
Carlysle Armory
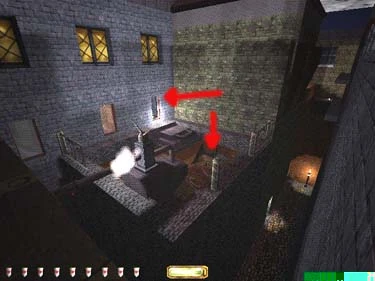
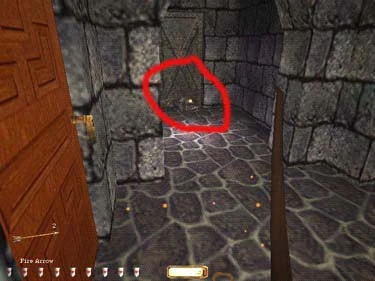
Dodge the archer and use the ledge to slip in the last window. Grab the vase (100) and head out the open window to the North. Break the skylight and jump down for some coins on the table (75 total). Be ready to rope out quickly - there's a guard in the next room. Go North across the banners to the Greenhouse. Inside is a small spider, two moss arrows, and a gas arrow. Outside, rope up to the small window on the right (figure 4). Deal with the guard here and blow the door using the sunburst device and a fire arrow (figure 5). Be careful to turn away or run around the corner to avoid taking damage from the explosion. Grab the stash and head back to the roof with the skylight.
 |
|
| Figure 4 | Figure 5 |
Dayport Traders Bank
Mantle through the open window to the East and go out to the bank ledge on the North. Drop through the window and find a place to hide. You'll need to pickpocket the key from the patrol guard. Go to the office on the right/south, pick the lock on the wall safe and throw the switch for the vault. Go across the hall, North, to the vault. Grab a purse (100 gold), 8 gems (200 ttl), 3 stacks of copper coins (15 ttl), and a stack of silver coins (12 gold). Get past the guard outside the double doors to the East and mantle up to the rampart on the left.
The Keeper and Lady Louisa's
Try to catch the keeper in the window to the left (not important, but interesting to see). Read the scroll on the table, then (secret) frob the torch in the hall to reveal a stash at the other end. Back on the roof, continue north through Lady Louisa's apartment. Grab the vase on the fireplace (100 gold), and relieve her of her purse (100 gold). Continue North, climb the machine up to the next roof and take the ladder on your left before the drunken guards. Cross the roof to the West and jump down to the Mechanists Tower.
Angelwatch Tower - Floors 1-3
Floor 1
Go south in the vent system to the last right turn. You will emerge in the southeast corner of the second floor. Beware the patrol in the hall outside, and take the elevator down to the 1st floor. Trigger the recording on the south wall (at which point you will be given a new objective- listen to all the voice machines). There is an Iron Beast the hall to the north and a guard at the front doors. Sneak to the alcoves, then distract the guard away from the statues (30 goods total) at the front door, on just use an invisibility potion. You can climb to the top northeast rafters and take the ladder to the 2nd floor, but the elevator is recommended since the ladder ends in an area you won't need to explore anyway.
Floor 2
Quick save before riding the elevator up (you might meet the patrol at the top...). Work your way south down the hall, and slip into the Chapel anteroom on your right. Douse the gas lights, grab the candlesticks and the key from the priest and use it to enter the communion storage room on the west side of the room. Pick the cabinet for 2 gold cups (50 gold total) and two gold wine bottles (100 goods total). Go back to the hall and south to the barracks. Loot the crates, grab the statue and the scroll in Valinius' room to the west, then go around to the back storage room and pick the liquor cabinet for 2 more gold cups (50 gold total). Backtrack through the barracks and take a right down the narrow hall. Sneak north through this room to the stairs and go to the third floor.
Floor 3
At the top of the stairs, go left to the balcony, mantle to the edge of it and shoot a vine arrow into the beams overhead (most of the complaints you'll get here are coming from the archer on the north balcony overhead). Either jump or use the vine arrow to get to the north balcony (figure 6) (you may want to pad it with a moss arrow first).
|
| Figure 6 |
Lean inside to the right to trigger the recording, then jump to the west balcony and go straight across the hall (you'll have to deal with a noblewoman here) to a chest with 120 worth of gold coins. Get back across to the east balcony and head down the hallway to the southeast corner and enter the library. At the foot of the stairs, shoot a moss arrow to the southeast corner above, then a vine arrow into the ceiling. Climb up to trigger the recording, then back down and climb the stairs - be careful not to alert the noblewoman and servant - blackjacking them is noisy and rouses the guard downstairs.
Angelwatch Tower - Floors 4-6
Floor 4
Cross the hall to the room with the nobleman and older woman, get their purses (30 gold total), then go the the middle room of the south hall for a healing potion and a gold coin stack (25 gold). There's loot in two rooms in the northeast corner of this floor, but use the crawlspace to the right of the big fireplace in the east hall to climb to the 5th floor.
Floor 5
You'll emerge in the kitchen. Work your way north up the west hall, looting as you go. Be sure to check the janitor's closet on the right for a switch on the upper inside door facing. It opens a door to the alarm controls for the office - shutting these off will save headaches later. Be sure to read the scripture in the wall safe of the corner room, and frob the left eye of the statue in the hall to open a supply closet nearby. When you reach the northwest corner of the hallway, turn and go back through the kitchen to the dining room, listen to the voice machine, then loot the study and head for the stairs in the northeast. Save the office for later - you need to go upstairs to the ballroom for the key first.
Floor 6
Kill the lights with the switch outside the ballroom door, then sneak around the edge of the room to the left to grab the nobleman's purse by the west wall. Go back around the other way, past the robot to the recording. You'll need to get close enough to Valinius and the other mechanist to trigger the conversation- you may want to use a speed or invisibility potion to get across the tile to the fireplace. Leave the ballroom before the conversation ends, as Valinius will head for the office on the 5th floor. Find a good place in the stairwell to ambush her with the blackjack or a gas mine (something quiet) and grab the key.
The Office & Getting Back
You may have to use a gas arrow on the guard outside the office. Once inside (being sure you've already turned off the alarm). Push the button under the desk, grab the plans from behind the picture, listen to the voice machine. Then go back to the kitchen and use the ladders and vent system to climb back down to the second floor where you can head north to the surface. Go back through Lady Louisa's apartment, but you may want to use the Shemenov estate instead of the bank to get back. Either deal with the guard on the white balcony and go across to the far roof, or sneak to the south balcony window of the bank and use the ledge to mantle up to the adjacent roof. You can sneak through across the roof to a door and down a set of stairs, while avoiding only one guard, instead of two in the bank (not to mention the loud floor). Use the ladder in the kitchen fireplace to get to the Shemenov roof, then go back to the astronomers hideout using the secret shutters. Go through to the rafters in the far room, jump down and head out the window to the east and across the rooftops to the bell tower.
Back to Index / Back to Trail of Blood / Forward to Precious Cargo